Pages

Wednesday, October 29, 2014

Fall Decor


It's Fall Ya'll!


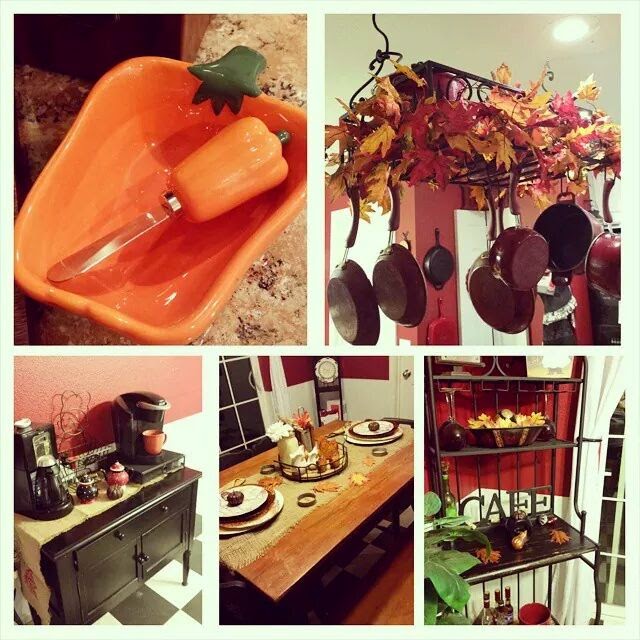
Hey guys, today's post will be short and sweet. It's all about my fall decor! Fall is my favorite time of the year, I just love all the pumpkin scented and flavored items that come out and feeling all warm and cozy as the weather starts to cool off outside. So, naturally this is one of my favorite seasons to celebrate in my own home. 

The Kitchen 

Complete with pumpkins, candles and leaves!


The Outside


Well I hope you guys enjoyed this, I just wanted to share my fall decor with you guys=]
Thank you!
<3 Kat

Sunday, October 26, 2014

Painted Counter tops

Hey Guys! 
Well, as promised, I am going to share with you how I painted my ugly plain laminate counter tops in my kitchen to resemble granite. This was so inexpensive and easy to do, I know it may sound kind of crazy when you think about painting counter tops but I promise you have nothing to be afraid of.

I'll start by showing you another before picture of my kitchen ( I apologize for the poor picture quality). They were just a plain grey laminate before and they were in excellent condition i just wasn't a fan. 

*before you start I suggest going to your local Lowe's or Home Depot and getting a laminate sample that you like, this will help you pick our the acrylic paints that you will need. You will need to figure out what base color you want them to be. I knew i wanted mine to mostly be tan with hints of black, cream and other lighter shades of tan. 

The first step is to tape off around your counters, sink, appliances..anywhere that you don't want paint and epoxy!
Then, make sure your counters are clean and dust free and dry them completely. now you're ready to roll the primer on. 


This is the primer i used for the counters, I just used a small roller and rolled it on pretty quickly making sure it was as even as possible. ( I also used this same primer on my kitchen cabinets, check out my previous post for more info on that!)

Let the primer dry, it doesn't take long for primer to dry. Then grab your sponge and your base color and get ready to start dabbing! This can be very therapeutic if you look at it positively=]
You are literally just dabbing the paint colors on layer by layer very lightly so you don't smudge the paint. start with your base color and cover the counters in this color initially and wait to dry before moving on to the next color. 

You can buy a craft sponge at Hobby Lobby or any craft store and just rip it up so you gt a more natural effect like a stone would have. 


Here are the paints i used. I started with the coffee latte as my base color since it was the darker tan. Then filled in the white spots with the country twill just like i did the base color. then, just keep layering until you are happy with it. Then, when you move onto your dark color and your white or cream accent color you want to use it sparingly because the lightest color and the darkest colors will pop a lot more than any other colors once the epoxy is poured. 


Once your paint is finished and dried you can use a very light grit sand paper to make it even but this is optional, it will just help it all blend a little better. 
Then its time for the epoxy, I was so nervous but had no reason to be because it was so easy. just prepare your epoxy according to the instructions on the box and work in sections a little bit at a time. I used a window squeegee to spread the epoxy around and drag it over the edges (make sure your cabinets and floors are covered well because it will drip!).
The epoxy is self leveling so don't worry if its not perfect when you first lay it down. once it is all laid you need to get all of the tape off of everything before it gets to tacky and will be hard to remove. I would keep coming back to it every few minutes to wipe any drips off of the edges of the counters so that they don't dry like that. After a couple of hours you wont have to do this anymore because it will begin to harden. Now comes the longest part of this, the waiting. You wont be able to use your counters for the approximated curing time according to the epoxy you use. I promise itll be worth it so just be patient!  
Click the link below to see the epoxy I used.

And the finished result! 


Look at how shiny they are, and thy are so easy to keep clean and wipe anything off of and i am a messy cook!

Here are some more pictures of how they look with my kitchen. 


I hope this inspires you guys to maybe try this in your own home and save some money. 
Thanks for the support as always! 
Make sure to subscribe and visit my instagram for more pictures of all my projects.
<3 Kat


Saturday, October 18, 2014

KatsKreativity: Kitchen Transformation/Painting Kitchen Cabinets

KatsKreativity: Kitchen Transformation/Painting Kitchen Cabinets: Hey everyone!  Well I have finally gotten caught up on home projects and since school is over I am ready to make this blog one of my prio...

Kitchen Transformation/Painting Kitchen Cabinets

Hey everyone! 
Well I have finally gotten caught up on home projects and since school is over I am ready to make this blog one of my priorities! I thought it was appropriate to make the first post in my new house about my new kitchen, since it was my first major project. The first thing we did when we closed on the house was buy cabinet paint and a sander and got started right away!

Here is the before and after=] I really disliked the color of the wood cabinets and have always loved the look of white cabinets in a kitchen, especially paired with dark hardware. I decided to bring in black to help balance how our kitchen and dining area is decorated and to warm up the space. Although it may look like we replaced the countertops, that is paint! Stay tuned for a post on how i did it. 


A closer look at the island, I love having an island! I made this into my cutting and prep station. 


Then, we added the drawer pulls to match the cabinet knobs. All of these were purchased at Menards and are linked between the pictures along with the template we used to install all of them.


 After this beautiful pot rack sat on the floor for a couple of months, we finally got it hung up securely. This was harder than I thought it would be but it was so worth it. It looks amazing and I don't have to waste cabinet space for pots and pans. 


Here is a closeup picture of the cabinets after the were painted. I didn't buy a fancy paint sprayer for spend a small fortune on doing this and the best part is that i did it all myself. I used a small roller for both the primer and paint. I did use a brush for the grooves of the cabinets to keep dripping from happening in those areas with the roller. its best to do the backs of the cabinets first, that way when you flip it once its dry you don't risk messing up the front side  


This is the primer I used (i also used this when I primed my counters, but more to come on that later)


This is the paint I used for the cabinets, I had both white and black in this. (excuse the picture, I am getting a new camera soon so no more phone pictures, yay!) it took three coats of this for the white and two coats for the black island and covered really well and smoothly. It is also extremely easy to keep clean, everything wipes off very easily and doesn't mess up the paint. 


I hope this will help some of you who are thinking of redoing your kitchen and the idea of painting cabinets has crossed your mind. I couldn't be happier with the outcome of my kitchen so far. I have plenty of ideas for this area soon and will be sure to include you in those projects! 
Thank you for all of the support and be sure to subscribe to get emails on new posts=]
-Kat


Tuesday, July 29, 2014

A quick update

Hello,

It has been a while..


I just wanted to get on here and give you a quick update on my life and why I haven't been posting. As you may remember me mentioning in a previous post, we bought a house! My husband and I bought our first home in May. It has been so exciting and we couldn't be happier now that we are home owners, which still makes me smile when I say it. With that being said, we have been extremely busy with little projects around the house. We have also had family come and visit for the very first time since being stationed here. I am so happy that they were able to see our house in person. I have finally gotten most of my projects under control and have accepted that no matter how much I accomplish, I will never be "finished" with my home. I will always find something else that I would like to change or do something to. Well, that is the reason I haven't been around lately but I have a list of things I need to blog about! Stay tuned to see plenty of before and after photos and many of my projects! =]

thank you so much!
<3 Kat

Sunday, April 27, 2014

kat's stuffed shells


This is my husbands all time favorite! he likes to call them "mini lasagnas" 
Instead of going out to a fancy Italian restaurant tonight with that special person, why not just stay in and have fun making your own dishes together and enjoy some wine while your at it. 

okay, once you have your wine glass filled, we will be ready to start!

What your gonna need:
  • box of big pasta shells
  • 1/2 lb ground beef (you could use turkey or veal just make sure its ground..use what you have on hand)
  • pasta sauce- however much you like, i used about a cup and half because we don't like them really saucey (i used homemade sauce but use whatever you like! you could even use just canned tomatoes and add seasonings if that's what you have. Ill share my pasta sauce recipe soon) 
  • 8 oz shredded mozzarella
  • Italian seasoning
  • parsley
  • 1 cup Parmesan (i spend the extra money and grate my own but use the can if that's what you like!)
  •  2 lbs ricotta cheese
  • 2 eggs
  • salt and pepper to taste
  1. get your shells cooking according to the instructions on the package and preheat your oven to 375 degrees.
  2. brown your meet in a pan until it is cooked thoroughly, then add in your Italian seasoning as you like. once combined add in your pasta sauce and stir to combine well.
  3. in a bowl combine the ricotta, eggs, parsley, Parmesan, mozzarella and salt and pepper. 
  4. put a ladle full of the sauce in the bottom of a lightly greased baking dish. 
  5. spoon some of the cheese mixture into the cooled shells and place in the bottom of the baking dish on top of the sauce you placed in there earlier. 
  6. pours the rest of your sauce mixture over the shells, cover and bake for around 30 minutes. 
  7. take out of the oven and sprinkle more mozzarella, Parmesan, and a lot of parsley (if you like it) on top.
  8. bake uncovered for another 10-15 minutes or until the cheese is bubbly and gooey!
serve this with some garlic bread, and a fresh tossed salad of your choice with a glass of wine and you have yourself a wonderful at home romantic Italian dinner that your partner is sure to love! 
now you can argue over what movie your gonna rent on TV...i cant help you much there..
hope you guys enjoyed! please keep following and sharing these posts, i really appreciate it and it means a lot to me.


<3Kat

white bread


Who doesn't love bread? who wouldn't love their home smelling like a bakery? 
exactly! 
this is why you should make your own bread and wow your spouse, friends, or loved ones as they walk in through the door and smell this wonderful recipe being pulled fresh out of the oven.

Here is the ingredients:
  • 1 3/4 Cups water
  • 3 tbsp butter
  • 1/3 c agave nectar or honey
  • 1 1/4 tsp salt
  • 2 1/4 tsp yeast 
  • 4 1/2 flour

  1. in a small pot, combine water, butter, honey and salt. Warm until its warm to touch but not hot. ( I usually heat it up until i start to see a little steam then i remove it from the heat and cool down a little)
  2. in your mixing bowl to your stand mixer, add 2 cups of flour and yeast and combine slightly. 
  3. add your warm liquid mixture in and beat until moistened.
  4. continue to add flour half a cup at a time until the mixture pulls away from the sides of the bowl.then switch to your dough hook.
  5. keep adding flour until sticky ball of dough has formed.
  6. place your dough ball into a greased bowl and lightly spray the top of the bread to keep from forming a hard crust. cover with a lint free dish towel and let rise for 90 min. TIP: to keep your dough away from any drafts or cool temperatures, turn your oven light on and put it in the oven to rise, make sure it is OFF.
  7. remove from bowl onto a lightly floured surface, press out air and forms into a loaf. 
  8. Place into greased loaf pan, cover, and let rise for 30 min or until it has puffed out of the loaf pan a bit.
  9. (make sure it is out of the oven now) preheat oven to 375 degrees and bake for 30 minutes.
  10. cover with foil and bake additional 5 minutes.
  11. you can spread melted butter over the top if you would like after it comes out of the oven. I dont like to do this personally because i like it to keep that slight crust on the exterior and it holds it shape a little better. sometimes loaves that have melted butter all over them can almost seem a bit soggy after it sits a while but its all a personal preference! thats the great thing about cooking and baking, its what YOU like and your opinion and you get to make it how you like....if everything in life was like that it would be a great world right?! 
I really hope you guys enjoy this wonderful bread recipe=]
thanks as always and keep following, sharing, and pinning;)
<3Kat

chicken biscuit dog treats


This is for all your animal lovers out there who have some fur babies of your own! I do think that i am the only person in the world who has two dogs that are allergic to peanut butter and a list of other things that normal dogs love. I have to be pretty careful with what i give to my dogs so i have perfected this recipe to suit their needs and benefit them in certain areas as well. and in case your wondering, I have a female black lab named Dixie Mae and a male chocolate lab named Bo Duke=]

                                                                Lets get started!
Here is what you will need:
  • 5 cups whole wheat flour 
  • 1 cup corn meal
  • 2 tsp chicken bouillon (i use the better than bouillon flavoring)
  •  1/2 tsp salt
  • 2 tbsp parsley (help with bad dog breath so i add more sometimes)
  • 2 eggs
  • 2/3 canola oil (this helps prevent urinary track infections in dogs)
  • 1 c milk ( i use skim milk)


  1. mix ingredients together using a mixer, start slowly then speed up. mix until it forms a ball of dough.
  2. if your using a stand mixer like me then just let the dough knead for about 5 minutes. if your using your hand then knead until everything is pretty silky and blended together. 
  3. form into ball on your counter and roll out with a rolling pin to about 1/4 inch thick
  4. cut out cookies with a cookie cutter or a biscuit cutter like i used. 
  5. bake at 350 for about 15 minutes on each side or until they are golden on each side. 


you could also use your finger to form paw prints before you bake!

and thats it! this does make a lot of dough so i usually cut it in half and freeze one half at a time. 
I hope you make this for you four legged friends=]
thanks and keep following!
<3Kat


honey mustard chicken thighs


We absolutely LOVE chicken thighs in this house! its so tender and flavorful, its also pretty cheap. in my opinion there is nothing better than some drumsticks tossed in a baking dish with some butternut squash, garlic, olive oil, herbs and roasted up till crispy and heavenly...but that's another post. 
This is my honey mustard chicken thighs..once again i don't have specific measurements but i am sure i can walk you through this because its so simple! I promise to start taking measurements...i just like to pretend i am some sort of scientist in the kitchen and throw things together and pray to sweet baby jesus it comes out ok. and in this case it was incredible and full of amazing flavors. 

go ahead and get your oven preheated to 350. then lay a package of thawed chicken thighs in the bottom of a baking dish ( i always trim extra fat off of mine so go ahead and do that now if you would like to as well)
then I mixed together with a whisk in a small bowl some regular local honey, regular mustard, and Dijon mustard until i got a consistency of a glaze. pour over chicken and use a basting brush to smother it all over the thighs. you can then salt and pepper to taste if you would like. then cover the dish with some aluminum foil and bake for about 25-30 minutes or until cooked thoroughly depending on your oven. I would pull the chicken out about half way through to flip the chicken and baste it one more then recover it and finish baking. I did this the second time i made them and it was so delish!

Bon Appetit! 
I hope you guys enjoy!
thanks for the continued support, keep following for more recipes.
<3Kat

Easy/Fast muffin tin pancake bites


Is your mouth watering yet? well if its not, I promise you that it will as soon as you smell this wonderful concoction baking in your oven in the morning!

First off, go ahead and get your warm cup of coffee brewing or your glass of orange juice if that's what your into.. and then get these ingredients together!

What you will need: 
  • pancake mix (any kind will work, but i like bisquick. or you could even make your own)
  • syrup 
  • toppings ( I used some cinnamon sugar on a couple and then some cooked bacon on the rest) 
  • whatever your pancake mix calls for  
how easy does it get? you most likely have all of these things on hand anyway and its a lot easier than standing over the stove flipping flap jacks!

I will apologize in advance for not having specific measurements, but i don't typically measure ingredients out. I just add what i like and how much i like and hope for the best.  here is what i did. 

I used the amount of the pancake mixture for the least amount of pancakes and whipped that up as directed on the box. I then added in the syrup until it was a bit runny. poured it into my greased muffin tin. then topped with my toppings, i highly recommend the bacon. then i baked at 350 degrees until the top was golden brown and they looked pretty solid. I tested mine the same as i would a cake, with a toothpick, just to make sure they were cooked thoroughly. This wont take long to cook so i would keep checking depending on how hot your oven runs.

I hope you guy enjoy this recipe because my hubby and I sure do!=]
thanks as always!
<3Kat

DIY mouthwash bottle (liquor bottle)

Here is my new mouthwash bottle that I made from a Crown Royal bottle! =]


First, I sanded down the bottle after taking the labels off just to rid of the shininess. 

 Then, I painted both the bottle and the cap this bronze paint i purchased from hobby lobby. 


Once that was dry I then painted it with a blue shade a made from mixing this turquoise paint with the white to make it more of a baby blue shade. 
after everything was dry i gently sanded the raised portions of the bottle to give it this shabby chic vibe. 

This looks great on our bathroom vanity! you should try this with any of your favorite shaped bottles=]
thanks for following!
<3 Kat


craft room progress

Hi guys! I am sorry for being MIA for the past month..life just got in the way. I wont bore you with all of my excuses but I will tell you some amazing news! My husband and I purchased a home!!=] we are so happy and excited and cannot wait to get out of base housing. Of course you know what this means, a ton of posts about all of my projects in the new house are on the way! I cannot believe i will have a house that is mine and i have the freedom to do what i want, SO EXCITING!
But enough about that, lets get into today's blog post. I wanted to go ahead and post what i have done to this house and some before and after posts before we move to show how i have transformed certain rooms. Please keep in mind that i was nowhere finished and had a lot of lined up projects and ideas, but now that energy can be put into my own home. I will start with my new craft room, I actually painted this pretty recently...before we found a house we wanted. So, naturally, now i have to paint it back white before we move out..don't you just love how things happen. Anyway, the room before was pretty useless. It had a desk, a cheetah rug and a bookshelf, needless to say I didnt go in there too often.
Here is the before picture, used some hand-me-down items and stuff i had from high school to put this room together. 

I decided i needed a space where i could devote my creativity to and have room to work on my projects (and eliminate paint and burlap from being on my kitchen counters)


And here is how far i got! the paint color is "Tree Bark Grey" from Walmart. The picture doesn't do it justice, it does have some grey undertones. the new rug was purchased from Kmart, on sale! I was aiming for the taupe and black color scheme and accent with cream. I was going to make ruffle cream curtains but didn't get that far.  

My craft table is two square storage cubicles from Target in the color "black ash" and a piece of wood i had cut at home depot and painted black to match. I just used Liquid Nails to secure the table top to the cubes. I then purchased storage baskets, my bar stool from Walmart, my Martha Stewart craft mat and other crafting tools, and my spinning storage carousel from Hobby Lobby.   


I will eventually have a sewing station in my craft room as well so i started making some decor to play with the crafting and sewing theme. I made these large all "buttons" from two extra chargers and the small one is a plastic plate. I did two coats on the two black ones and then hot glued the twine in an X pattern in the middle to resemble buttons. 


I love the way this "button" turned out. I painted it the tan color first and then went in with the cream color and light handedly made it look distressed, i then went in with a dry paint brushed and lightly wiped off some of the paint. hen glued the twine on the same as the black ones.  


Aren't the scissors just adorable! I got them from hobby lobby and painted them then stamped them on one side. I also added a little brad for some glam!


The bookshelf is pretty much the same as before but now it houses my new wireless printer. 


This is a wall shelf unit i purchased at a yard sale for $10 and spray painted it black. I just have some cards i have made recently on it along with some wooden stamps from Stampin Up!


and from the other side of the room. I took off the ugly wood bifold closet doors with the intention of putting up matching curtains here as well. I also wanted decorative picture and storage boxes on the shelf above my laptop area. 


I hop you guys enjoyed this post of my craft room so far. I will kepp you updated on the changes that are made in the new house. I will most likely combine this decor with my foyers decor for the new home. 
Thank you so much! keep on following=]
<3 Kat


Sunday, February 16, 2014

DIY Trunk

This old hope chest was passed down to me by my mother when i got married. After recently redoing the decor of my living room, I decided it was time to update this trunk as well.

 Here is the before..pretty boring and plain. 

I started by taking the gold knobs off and sanding down the trunk just enough to take off some of the shininess. 

Then, as you can see, I did one layer of white paint on the middle of the trunk and on that little decorative piece at the bottom. I ended up doing 3 thin coats of the white paint. 


After the white dried I stained the top and bottom of the trunk a dark wood brown. 


 Last but not least, I added these deer antler drawer knobs from Hobby Lobby after i distressed the white paint with sandpaper. 

Here is the finished product in my living room. I plan to make a cushion and pillows for it out of potato sacks, I will do a post on that once I get around to it! The big plan for this is to be a gun storage trunk for all of my husbands rifles and shotguns. I like this idea better than a typical gun showcase or cabinet. I will keep ya'll updated on both of those DIY projects as they happen=]

I really hope you all are enjoying these posts and keep following for plenty more to come! 
Thanks! -Kat